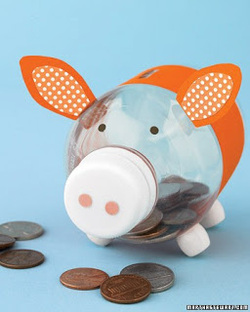
Bottle Piggy Bank
You will need:
1 Small Pop/Soda Bottle,
2 Sheets Of Card/Thick Paper,
4 Pony Beads,
1 Thin BLACK Marker Pen,
1 Thin PINK Marker Pen,
Scissors,
Pencil,
Ruler,
Glue.
How to Make:
Take your bottle and wash it out, place upside down on a paper towel to make sure ALL the water is out.
Next when the bottle is dry cut a strip of card about 2 inch (or 5 cm) wide and long enough to wrap around the bottom of your bottle. Cut the card about 1 inch (2.5cm) longer than you need so it will overlap at the end.
Once you have cut you card, place one end of the card onto the bottle and secure it with glue or a small amount of sticky tape, then wrap the rest of the card around your bottle and secure to the bottle,
While the glue is drying take 2 small amounts of card (different colours) and cut 2 pear shapes out of each colour, remember to make 2 of them a little smaller than the others this is so they will fit together to make the ears.
Then stick 1 of the smaller shapes onto the larger shape with glue, leave to dry and repeat this on the 2nd lot of shapes.
While the ears are drying take a pencil and a ruler, measure a small line in the middle of the care you wrapped around the bottle earlier, this is going to be where you put your money into the piggy bank so you have to make it big enough to accept all sized coins.
Once you have drawn your line get a adult to cut the small slit out.
Now fold a small amount at the bottom of your ears and use it to stick the ears to the bottle.
Take your 4 pony beads and glue them to the bottom to make the feet.
Once the pony beads are dry take your black and pink markers and draw on the eyes and nose (if you dont have markers you can use small black and pink stickers instead.
We really hope you enjoy making this as much as we did. Thank you for using Kiddie Crafts and why not check out what other ideas we have.
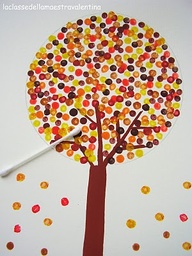
Budding Tree
You will need:
Red, Blue & Yellow Paint,
Cotton Q-Tips,
Paint Brush,
Plate for mixing Colours,
2 sheets of Paper,
Round Plate or Dish,
Pencil,
Scissors,
Glue.
How to make:
Use your paints to make BROWN, then paint a simple tree trunk and branches.
Next mix a few different colours with your paints (so you end up with about 4-8 colours),
Now take a Q-Tip, place it into a colour and then dab it around the branches on the tree, after you have dabbed it a few times, take another Q-Tip place it in a different colour and repeat the process.
Build it up by adding different colours, then once you have filled up most of the area take a round place or dish, place it over the branches and draw around it (You don't need to draw on the trunk)
Now cut around the circle so you have a tree shape, then glue this to another sheet of paper and use more Q-Tips to add a few more leaves, this will give the effect leaves are falling from the tree.
We really hope you enjoy making this as much as we did. Thank you for using Kiddie Crafts and why not check out what other ideas we have.
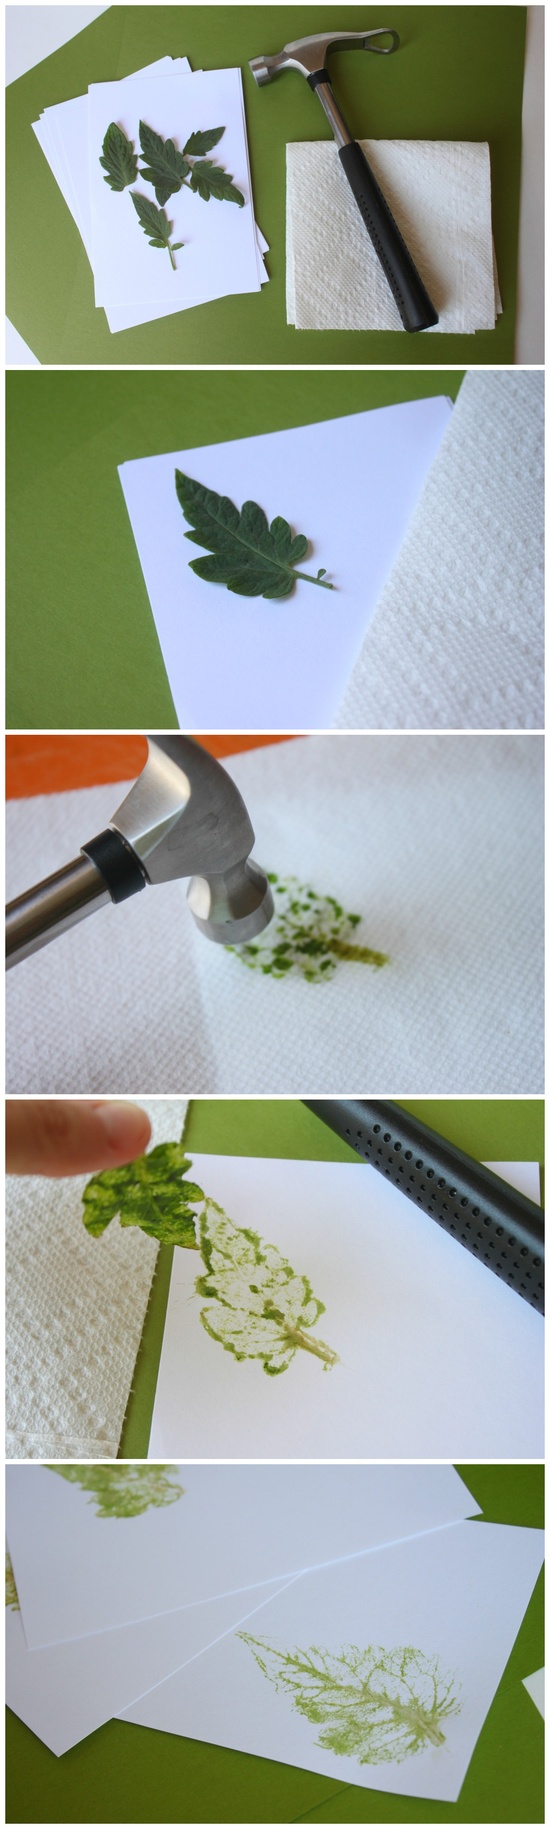
Natural Leaf Prints
You will need:
Hammer,
Freshly Picked Leaves,
Kitchen Roll,
White A4 Paper.
How to Make:
First take a sheet of A4 white paper and place a leave where you want your design to be.
Now take a sheet of kitchen roll, place it over the leaf and gently tap it with the hammer,
Tap all around the leaf and you will start to see the shape of the leaf through your kitchen roll.
Once you can see a green leaf shape on your kitchen roll, remove the kitchen roll and the leave.
You will now be left with a beautiful leaf design on your paper.
Now why not see what other designs you can make.
We really hope you enjoy making this as much as we did. Thank you for using Kiddie Crafts and why not check out what other ideas we have.
Rocket Bookmark
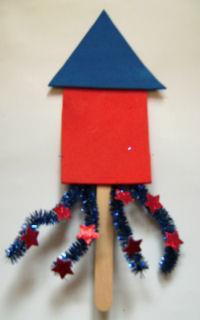
You will need:
Craft foam in two colours
Lolly stick
Sparkly pipe cleaners (chenille stems)
PVA/ White glue
Star sequins or a star punch and sparkly paper
How to make:
Cut out a triangle and a rectangle from the foam. Glue the triangle to the top of
the rectangle. Glue the lolly stick to the bottom of the rectangle.
Cut two pipe cleaners in half and glue them to the bottom of the rocket. Punch out
lots of paper stars (or use sequins) and, putting a dab of glue on the back of
each, glue them along the pipe cleaners.
Make sure your bookmark dries thoroughly before using it!
We really hope you enjoy making this as much as we did. Thank you for using Kiddie Crafts and why not check out what other ideas we have.
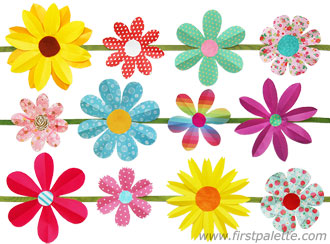
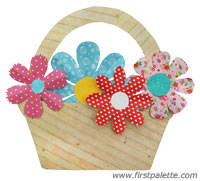
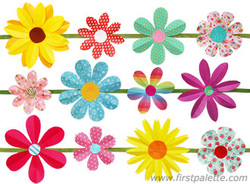
Folding Paper Flowers (8-Petal Flowers)
What you will need:
Paper,
Scissors,
Glue.
How to make:
Start out with a square piece of paper.
*Try not to use thick or heavy paper as it may be difficult to fold and cut.
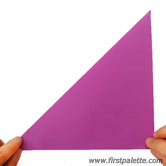
Step 1: Fold the square diagonally in the middle to come up with a triangle.
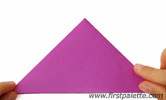
Step 2: Fold the resulting triangle along the middle to come up with a smaller triangle.
Step 3: Fold the resulting triangle again in the middle to come up with an even smaller triangle.
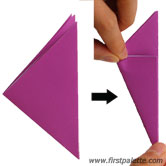
Step 4: Rotate the triangle so that its longest side is positioned vertically and its solid corner (the corner corresponding to the paper's center) is at the bottom.
Step 5: Bring the short side closest to the bottom towards the triangle's long side.
Step 6: Trim off the extra triangle above the straight edge.
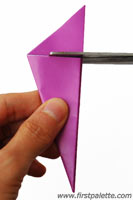
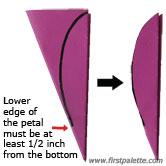
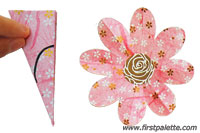
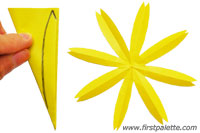
Step 7: Draw half a petal starting from the top corner of the triangle's vertical side and ending about a half-inch from the bottom of the triangle's long side. Cut along the outline.
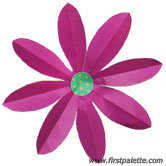
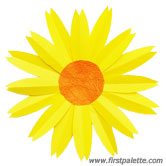
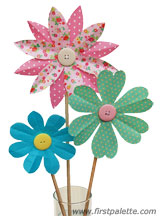
Step 8: Gently open up the paper to reveal an eight-petaled flower. Cut out a circle from paper, felt, craft foam, or fabric. Glue it a the center of the flower.
Paper flowers are great for decorating a room for spring. Glue them together into a garland or stick them around window sills, walls, or bulletin boards.
We really hope you enjoy making this as much as we did. Thank you for using Kiddie Crafts and why not check out what other ideas we have.
Paper,
Scissors,
Glue.
How to make:
Start out with a square piece of paper.
*Try not to use thick or heavy paper as it may be difficult to fold and cut.
Step 1: Fold the square diagonally in the middle to come up with a triangle.
Step 2: Fold the resulting triangle along the middle to come up with a smaller triangle.
Step 3: Fold the resulting triangle again in the middle to come up with an even smaller triangle.
Step 4: Rotate the triangle so that its longest side is positioned vertically and its solid corner (the corner corresponding to the paper's center) is at the bottom.
Step 5: Bring the short side closest to the bottom towards the triangle's long side.
Step 6: Trim off the extra triangle above the straight edge.
Step 7: Draw half a petal starting from the top corner of the triangle's vertical side and ending about a half-inch from the bottom of the triangle's long side. Cut along the outline.
Step 8: Gently open up the paper to reveal an eight-petaled flower. Cut out a circle from paper, felt, craft foam, or fabric. Glue it a the center of the flower.
Paper flowers are great for decorating a room for spring. Glue them together into a garland or stick them around window sills, walls, or bulletin boards.
We really hope you enjoy making this as much as we did. Thank you for using Kiddie Crafts and why not check out what other ideas we have.