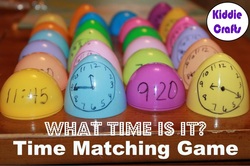
Learning the time.
You will need:
Approx 12 multi-coloured plastic eggs,
A thin black marker pen,
Pack of white labels (Optional)
How to make:
Take the plastic eggs apart and mix the colours up, (for example place a blue top on a yellow bottom and a yellow top on a red bottom)
Then draw a circle on each of the top halves of the eggs, once you've done this fill the circles with the numbers 1 to 12 so it looks like a clock.
Once you have your clock think what time's you would like your child to learn, choose 1 time per egg, then on the top half draw your clock hands on the time you have chosen and on the bottom half write the time like it would show on a digital clock.
Once all 12 eggs are done leave for approx 15 minutes to dry, then split all the eggs in half and let your child put them back together correctly. You can also buy a pack on white labels, cut out 12 circles and 12 rectangles, then place a circle on the top half and a rectangle on the bottom half of the egg before you draw on the time, this way you can change the times by simply peeling the label off and placing a new one on. This way these eggs with grow with your child's knowledge.
We really hope you enjoy making this as much as we did. Thank you for using Kiddie Crafts and why not check out what other ideas we have.
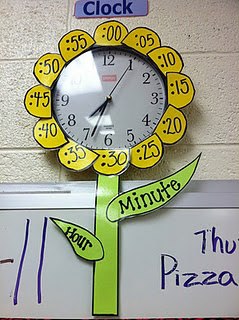
Sunflower ClockThis sunflower clock is a great, fun way of teaching children how to tell the time without them even realising.
You will need: A wall clock, Coloured card for petals (This used yellow however any bright colour will do) Green card for stem and leaves, Black marker pen, Ruler, Scissors, Pencil, Double sided sticky tape or all purpose glue. |
|
How to make it:
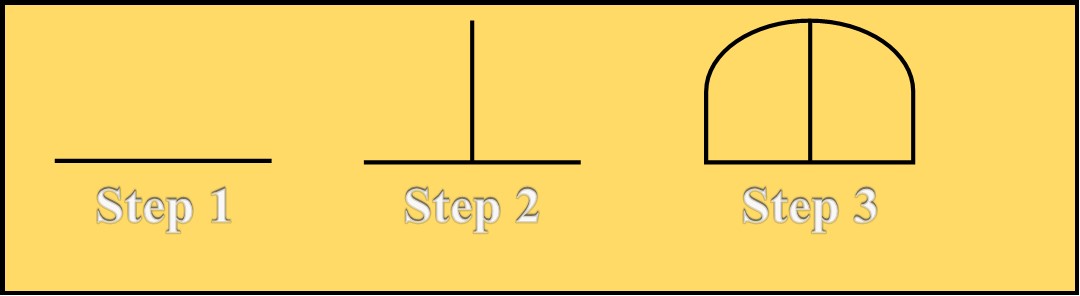
Take your ruler and measure the distance between numbers 1 and 2,
For example is the measurement is 5 cm, take your coloured card and using your pencil draw a line 5 cm long, leaving the ruler in place draw a small dot half way along the line, the turn your ruler vertical and draw a faint line from the dot, 5 cm up, you will then have a upside down "T" shape. Now using the pencil again draw a arch shape from one side to the other.
Do this 12 times, (remember this does not have to be a perfect shape just a rough shape of a petal)
Once out have drawn 12, place the coloured card to one side and now get your green card.
Now using your pencil draw a thin rectangle shape approx the same length as the clock and not quite as wide as the petals you have just drawn, so if the petal is 5cm wide, make the stem 3 cm or 4 cm wide.
Then about halfway to the stem draw 2 leaves attached to the stem, make the one on the left quite a bit smaller than the one on the right, this is to signifie the hour hand is smaller than the minute hand on the clock.
Once you're happy with the shape of the stem and leaves, draw around the shape with a black marker pen, then do the same with the petals. Once you have drawn around them all cut them out, remember to leave the leaves attached to the stalk.
Now take the stalk and on the small left leaf write "Hour" and on the large right leaf write "Minute" then take your 12 petals and on the 1st one write ":00" this indicates zero minutes, then on the next one write ":05" now carry on and do the rest :10, :15, :20 and so on up to and including :55.
Now you're ready to assemble your clock, place a small amount of double sided sticky tape under the "Number 6" then attach your stem to it, Now take your 1st petal ":00" and position it above the number 12, use double sided sticky tape to keep in place, then place the petal saying ":15" next to the number "3", ":30" next to number "6" and ":45" next to number "9". secure them all with tape. Now secure the rest of the petals in place.
Your clock is now complete, you can also try different coloured and shaped petals to give different effects.
We really hope you enjoy making this as much as we did. Thank you for using Kiddie Crafts and why not check out what other ideas we have.
